Overview on this article:
- What are the advantages of owning a personal website?
- The hidden costs behind "free" websites.
- Step-by-step guide: The easiest way to build your own personal website.
- Hand-on: build a budget-friendly methods for creating a sleek, functional personal website.
- What are the advantages of owning a personal website?
Having a personal website offers numerous benefits in today's digital landscape:
- Professionalism: A personal website serves as an online representation of yourself. It's a professional platform where you can showcase your skills, experiences, and accomplishments in a structured manner.
- Increased Visibility: Having a personal website allows you to control your online presence. You can tailor the content to highlight your strengths and expertise, making it easier for others to find and learn about you.
- Networking Opportunities: Your personal website can act as a central hub for connecting with colleagues, potential employers, clients, or collaborators. It provides a convenient platform for sharing your contact information and portfolio.
- Portfolio Showcase: If you're in a creative or professional field, a personal website is an ideal place to display your work. Whether it's art, photography, writing samples, or projects, a website allows you to showcase your portfolio in an organized and visually appealing manner.
- Control and Ownership: Unlike social media platforms or third-party services, you have full control and ownership of your personal website. You can customize its design, content, and functionality according to your preferences without being subject to algorithm changes or platform limitations.
- Career Advancement: A well-designed personal website can enhance your professional credibility and contribute to career advancement opportunities. It can serve as a powerful tool for impressing potential employers, recruiters, or clients who may be researching your background.
- Learning and Growth: Building and maintaining a personal website can be a valuable learning experience. You can gain skills in web design, content creation, SEO optimization, and digital marketing while actively managing your online presence.
These compelling reasons have driven me to create my personal website. It's a proactive step towards controlling my online image, showcasing my skills, and fostering professional connections.
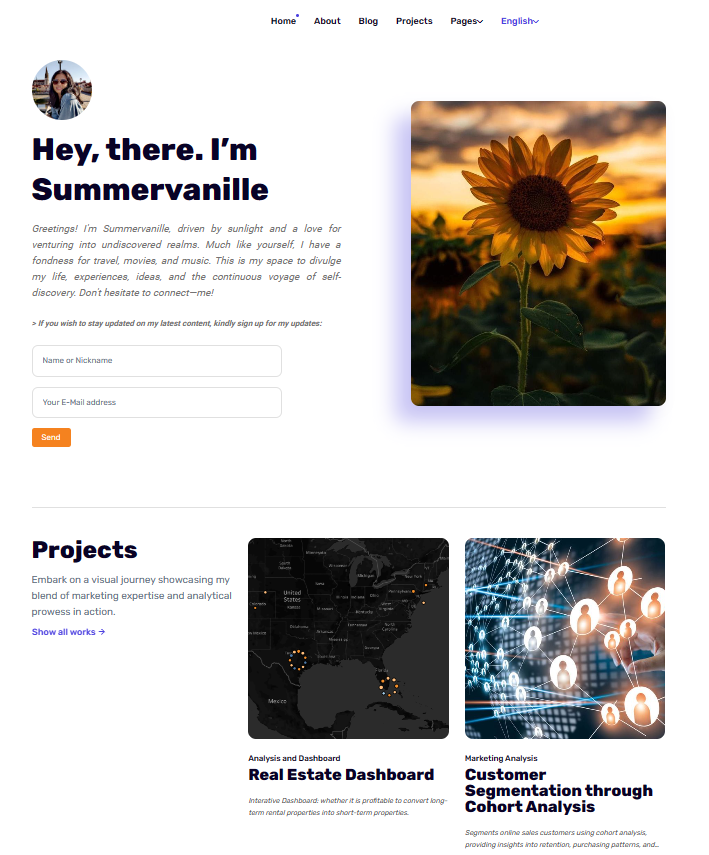
Figure 1: My personal website - The hidden costs behind "free" websites.
There are two kinds of websites: static and dynamic websites. They represent two different approaches to website development, each with its own advantages and use cases:
Static Websites:
- Definition: Static websites consist of web pages with fixed content that remains the same for every visitor. The content is manually coded into HTML files and doesn't change unless the site owner manually updates it.
- Technology: They are typically built using HTML, CSS, and sometimes JavaScript. No server-side processing or database integration is required.
- Advantages:
- Simplicity: Static sites are easy to create and deploy since they don't require server-side processing.
- Speed: They load quickly since there's no need for database queries or server processing.
- Security: Static sites are less vulnerable to hacking attacks since there's no backend code or database to exploit.
- Use Cases: Static sites are suitable for simple websites with fixed content, such as portfolios, landing pages, and informational websites.
Dynamic Websites:
- Definition: Dynamic websites generate content dynamically based on user interactions, database queries, or other external factors. Content can change for each visitor or based on specific criteria.
- Technology:They often involve server-side scripting languages like PHP, Python, or Ruby, along with databases like MySQL or MongoDB.
- Advantages:
- Interactivity: Dynamic sites can offer personalized content, user authentication, and interactive features like forms and e-commerce functionalities.
- Scalability: They can handle large amounts of data and complex functionalities, making them suitable for robust web applications.
- Content Management: Dynamic sites often utilize content management systems (CMS) that allow site owners to easily update and manage content.
- Use Cases: Dynamic websites are ideal for e-commerce platforms, social networks, forums, blogs, and any site requiring frequent content updates or user interactions.
In summary, static websites are straightforward, fast, and secure, making them suitable for simpler projects with fixed content. On the other hand, dynamic websites offer greater interactivity, scalability, and flexibility, making them the preferred choice for complex web applications and sites requiring frequent content updates or user interactions.
In this article, I'll focus solely on building a static website, as it can meet all your needs and offer the benefits you desire, including showcasing your portfolio, projects, and professionalism, in an easy, efficient, and budget-friendly manner.
If you're aiming to create a customized and professional static website, it typically involves some costs. Allow me to explain why:
- Domain: A personal domain is important because it adds professionalism, control, and credibility to your online presence, while also enhancing branding and SEO efforts; however, it requires renting and renewing the domain fee annually.
- "Free" platform:
Many platforms like Wix, WordPress.com, Weebly, and Google Sites offer free website building services, but if you wish to customize the design to suit your content, connect a personal domain, or access additional personal features, they may require a subscription fee ranging from $8 to $25 USD per month.
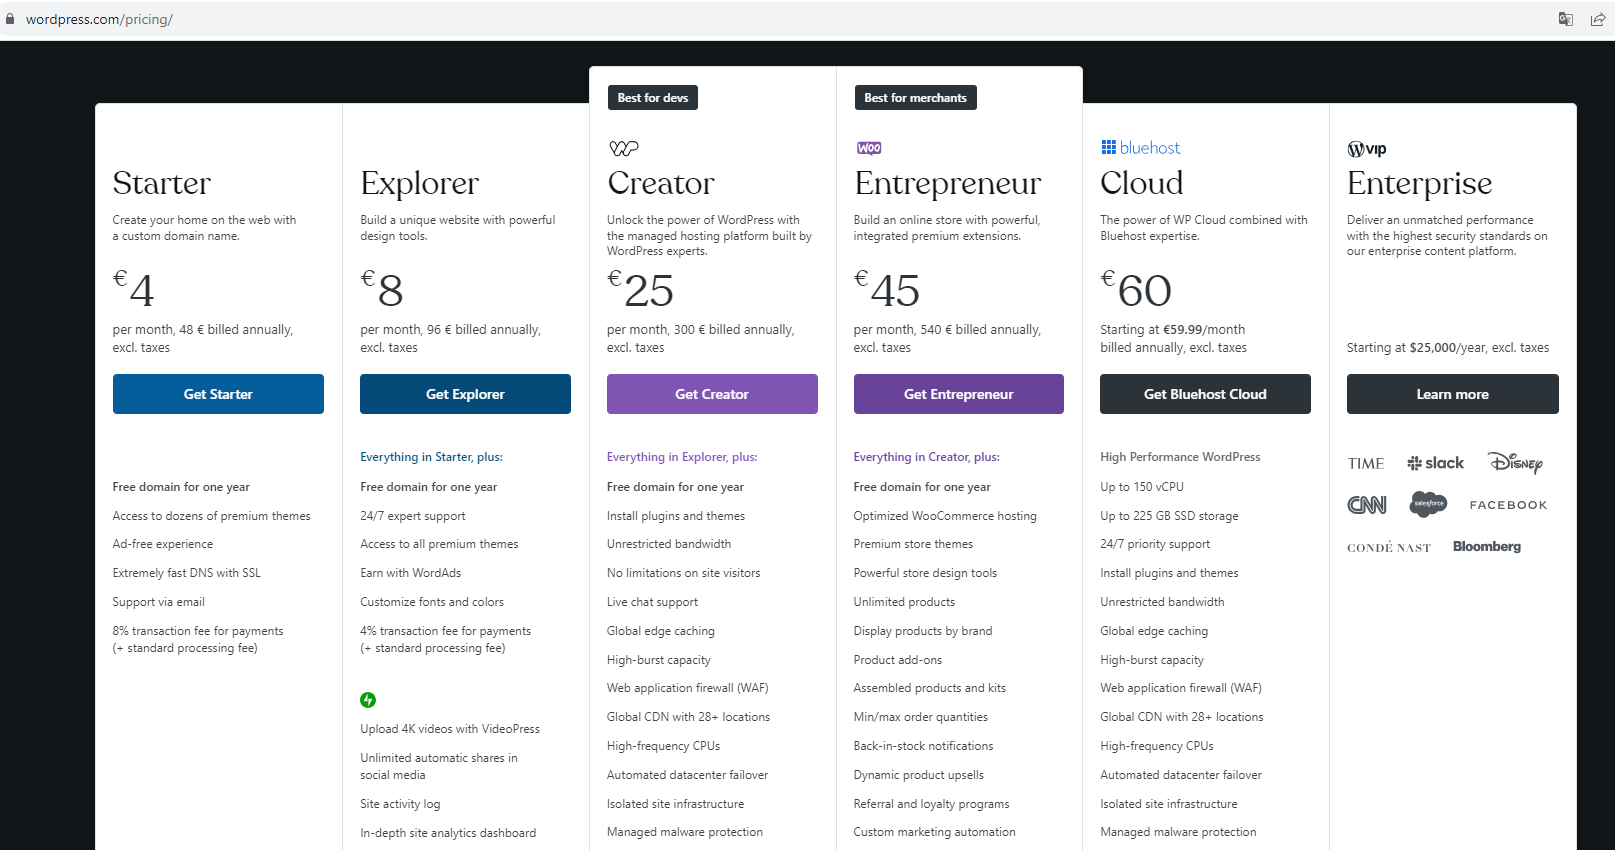
Figure 2: WordPress Prices
In the last section of this article, I'll outline how to achieve this goal by utilizing cost-saving strategies and leveraging free resources effectively.
- 💡Step-by-step guide: The easiest way to build your own personal website.
Firstly, let me introduce the easiest way to build a website, which can be accomplished in just 2-3 days.
- Choose a Platform: Selecting a website builder platform tailored to your needs and skills is crucial. While Google Sites offers simplicity, for a more flexible and professional website, WordPress is often the preferred choice.
- Follow the steps outlined to build your website. Follow the guide provided by the platform, as it usually offers a user-friendly walkthrough to help you complete all the steps in just a few days. Here's the guide fromWordPress.Here, I won't simply copy and paste content. The platform provides both video and picture formats, which are easy to understand and follow along with.
- SEO Optimization: Optimize your website for search engines by adding relevant keywords, meta descriptions, and alt text for images. This can help improve your site's visibility in search engine results.
- Regular Updates: Regularly update your website with fresh content, such as blog posts, portfolio updates, or news articles, to keep visitors engaged and encourage return visits.
As mentioned earlier, while it may be the easiest option for some, it might not be the best fit for everyone. Personally, I also prefer a low-cost but personalized website. What about you?
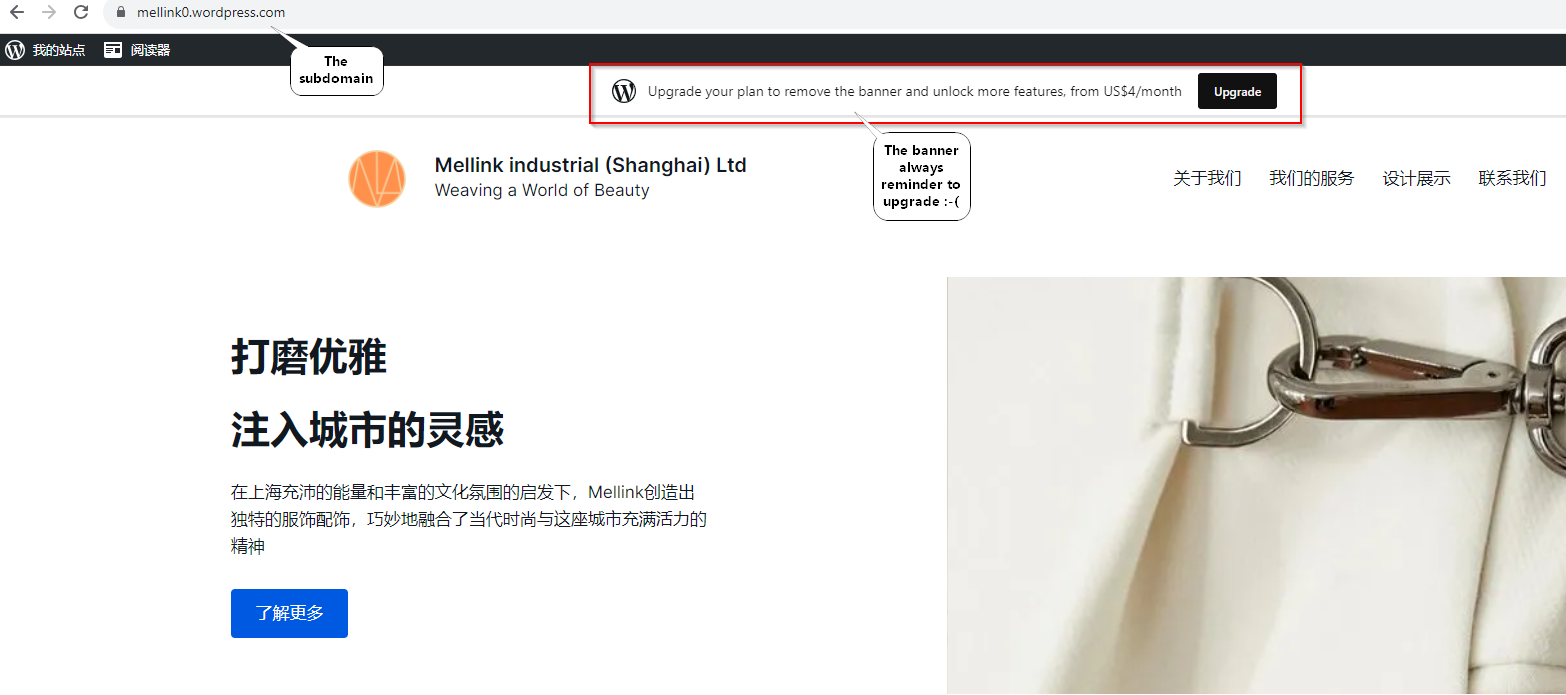
Figure 3: The free website using WordPress
- 🎀 Hands-on: budget-friendly methods for creating a sleek, functional personal website.
Now, I'll illustrate how I set up and maintain my website with only a $10 annual fee.
- Have a basic understanding of HTML and CSS: HTML (Hypertext Markup Language) and CSS (Cascading Style Sheets) are often perceived as beginner-friendly languages due to their straightforward syntax and immediate feedback in web development. While creating sophisticated designs may demand ongoing practice and experience, building a basic website only requires the ability to read and modify structure and attributes, making minor adjustments as necessary.
💡Here I recommend the cousera course: Web Design for Everybody - Finde a interesting template and personalize it: Browse free and public template provided websites like githuh's (Jekyll theme ) ThemeForest or TemplateMonster to find an intriguing template, then personalize it by adjusting content, colors, and layout to create a unique website that reflects your style and objectives.With your understanding of HTML and CSS and the plethora of online resources available, you have the capability to personalize web pages according to your preferences and needs. I use the free app Sublime to write HTML and CSS code, but you're welcome to use any tool you prefer.
- Create a repository on GitHub and upload all your website materials to it: GitHub Pages is a free service provided by GitHub for hosting static websites directly from GitHub repositories.
- Turn on GitHub Pages feature for your repository, follow these steps:
- Navigate to your repository on GitHub.
- Click on the "Settings" tab at the top of the repository.
- Scroll down to the "GitHub Pages" section.
- Under "Source", select the branch you want to use for GitHub Pages. Typically, you'll choose the "main" branch or "master" branch.
- Optionally, select a folder in your repository to serve as the root directory for your website.
- Click on the "Save" button. GitHub Pages will then build your site and provide you with a URL where your website is published.
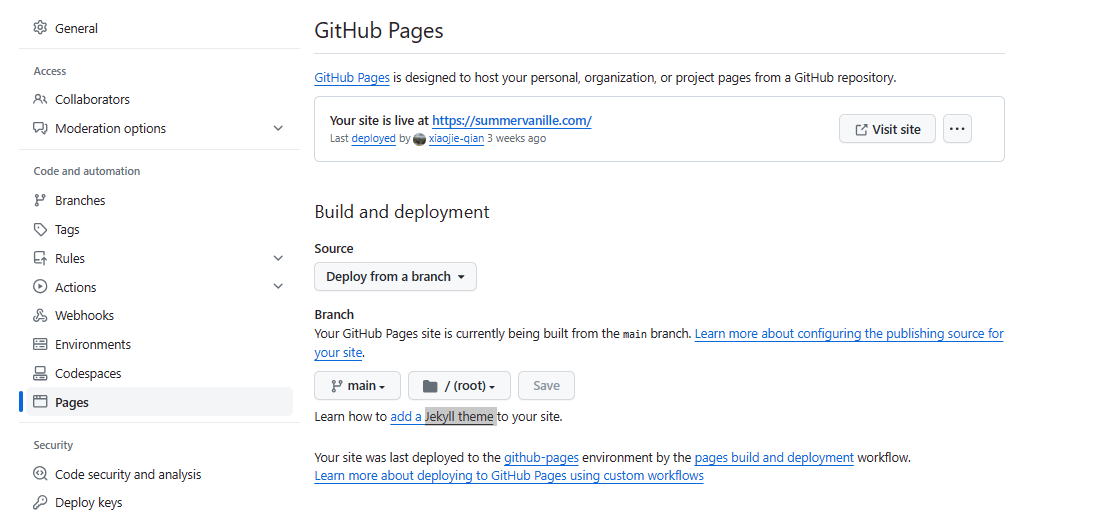
Figure 4: Github Pages setting
- Purchase your own domain: Since you are aiming to avoid platform subscription fees but still want a professional personalized domain, you can explore domain registrars like Aliyun for .cn domains or other websites offering various domain extensions. Comparing prices across different registrars will help you find an affordable option that suits your needs. My domain is purchased via namecheap platform. Simply enter the desired domain name into the search bar on their websites, and they will provide you with information on availability and pricing for registration.
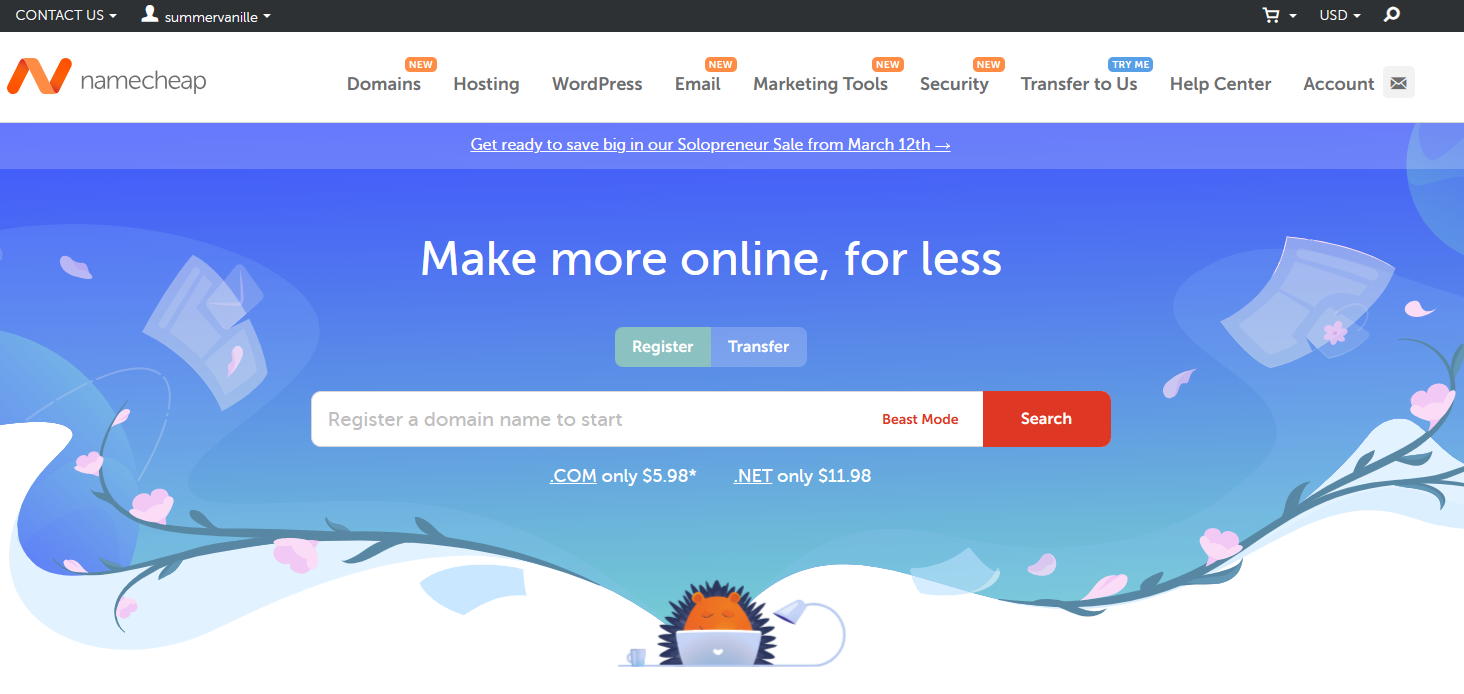
Figure 5: Valid domain search
- Connect your domain to your GitHub Pages website:
- Access DNS Settings: Log in to your domain registrar's website and navigate to the DNS settings or domain management section.
- Set up DNS Records: Add DNS records to point your domain to GitHub's servers. You'll typically need to create two records:
- - A records: Set the A record to GitHub's IP addresses (185.199.108.153, 185.199.109.153, 185.199.110.153, 185.199.111.153).
- - CNAME record: Create a CNAME record that points to your GitHub Pages URL (username.github.io).
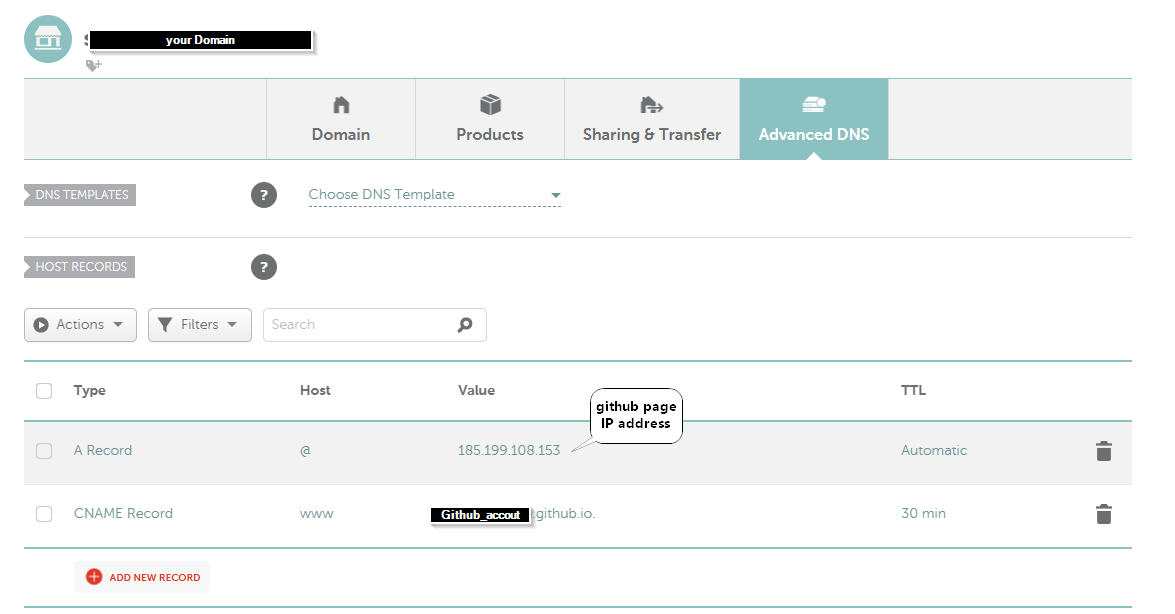
Figure 6: DNS setting
- Save Changes: Save the DNS changes, which may take some time to propagate across the internet.
- Configure GitHub Pages: In your GitHub repository settings, scroll down to the "Custom domain" section and enter your domain name (e.g., example.com).

Figure 7: Github Pages domain setting
- Enforce HTTPS (Optional): To secure your website with HTTPS, enable HTTPS enforcement in your GitHub repository settings.
- Verify Configuration: After making the necessary changes, verify that your domain is correctly connected to your GitHub Pages website by accessing it using your domain name (e.g., example.com).
Once the DNS changes have propagated and your domain is connected to GitHub Pages, visitors will be able to access your website using your custom domain.
Next, you can link your website to Google Analytics to track visitor data and adopt SEO practices to improve your website's visibility in search engine results. I'll introduce those methods in the next sessions.
If you have any questions regarding this article or need assistance with building a website, please don't hesitate to reach out.
- Have a basic understanding of HTML and CSS: HTML (Hypertext Markup Language) and CSS (Cascading Style Sheets) are often perceived as beginner-friendly languages due to their straightforward syntax and immediate feedback in web development. While creating sophisticated designs may demand ongoing practice and experience, building a basic website only requires the ability to read and modify structure and attributes, making minor adjustments as necessary.
